How to manage files with Documents Manager
Documents Manager is the centralised asset library for a Marketing Tenant: one place to upload, organise, search, preview, replace, and delete images, videos, and documents — then reuse them from Pages, email and marketing rich text, and any entity form.
What you'll build
Working knowledge of the whole asset lifecycle, by doing it:
- Upload files, including a folder drop, and understand the signed-URL flow underneath
- Organise them with the tag tree that acts as your folder structure
- Build a saved smart view for a recurring search
- Replace bytes behind an existing asset without breaking links
- Move files to trash, restore one, and purge the rest
- Select the same asset from a Pages field, a rich-text editor, and an entity form
Time to complete: 40-50 minutes
Prerequisites
- Access to the Documents Manager screens in your instance (
file_manager_mainandfile_manager_trash) - A DXP API key (
X-API-Key) if you want to drive the upload flow yourself - Familiarity with Business Units if your tenant has more than one
How it works: two cooperating systems
Understanding this split explains nearly every behaviour in the product:
| Concern | Owner | Surface |
|---|---|---|
| File and tag metadata — names, alt text, tags, size, dimensions, status, content hash, saved searches | DXP entities | Stack9 named queries (for example file_manager_listfiles), gated by screen permissions |
| S3 object lifecycle — signing uploads and previews, moving objects to and from trash, batch deletes | The storage broker | POST /file_manager/* REST endpoints |
The broker holds no metadata — it is a thin, authorized gateway to object storage. The UI never talks to it directly; it calls named queries that proxy through. That is why screen permissions and named-query allow-lists stay in force even for storage operations.
There is no GET /files REST endpoint. Metadata reads and writes go through the named-query library (file_manager_listfiles, file_manager_updatefile, file_manager_deletefile, and so on), each of which must be allow-listed on the screen that calls it. Only the storage operations in the table above are REST endpoints.
Every read narrows to the active library — a Business Unit or the Shared Asset Library — and every write is re-authorized server-side against the caller's authorized Business Units. A tenant that has never created a second Business Unit sees exactly one writable library and no switcher.
Step 1: Open Documents Manager
The module ships two screens: browse (file_manager_main) and trash (file_manager_trash).
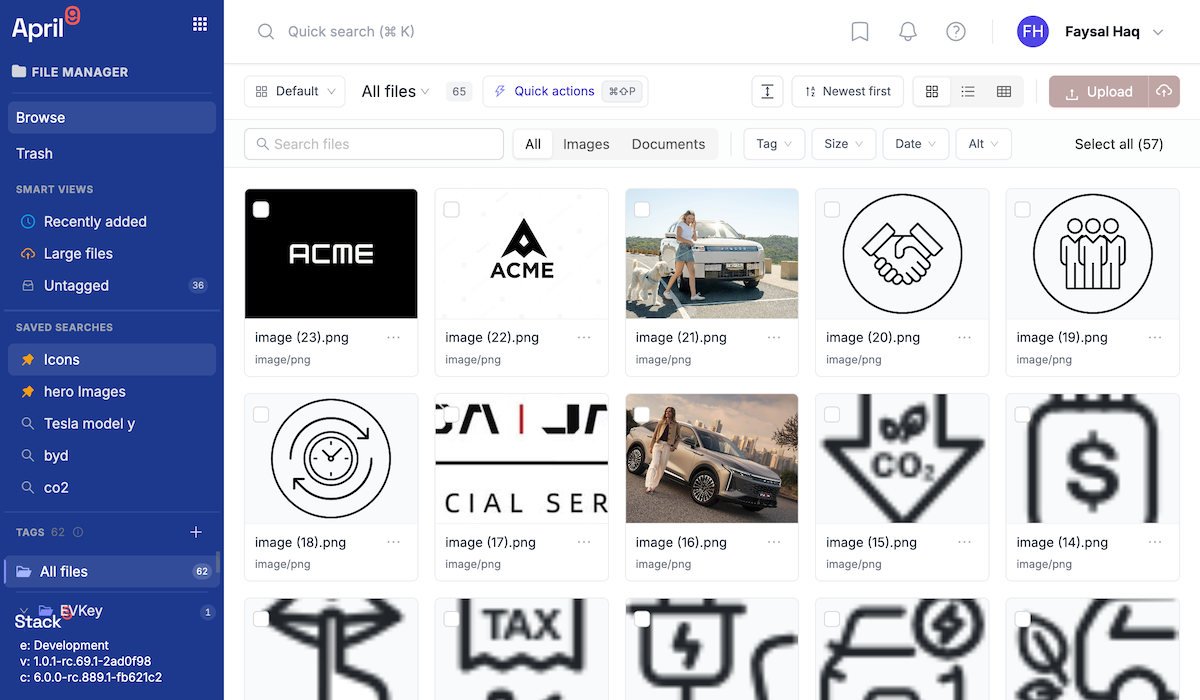
Orient yourself before uploading anything:
- Tag tree (left) — your folder structure. See Step 3.
- Saved searches — pinned smart views. See Step 4.
- View modes — grid, column view, and list. Large libraries render virtualised, so scrolling stays smooth.
- Library switcher — only appears when your tenant has more than one Business Unit, or you are a Tenant Owner.
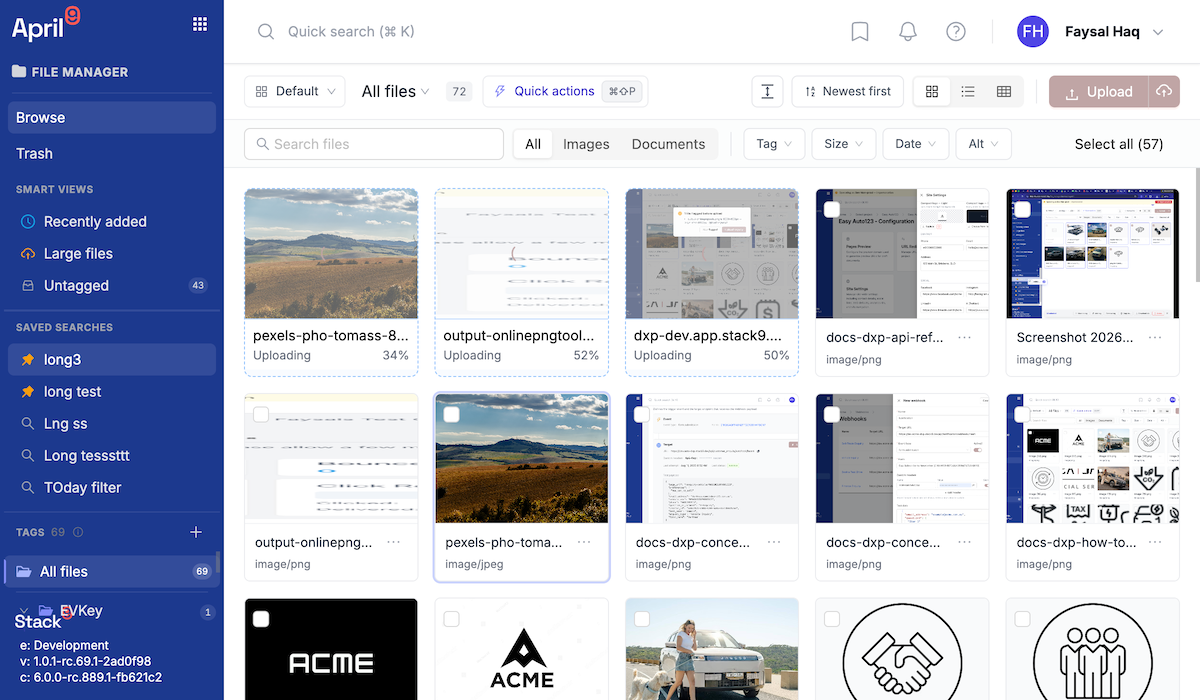
Step 2: Upload files
The paths into the queue
| Entry point | How |
|---|---|
| Upload menu | Toolbar button, opens the OS file dialog |
| Drag and drop | Drop files anywhere on the grid |
| Clipboard paste | Paste an image straight from the clipboard |
| Folder drop | Drop a directory — see Step 3, folders become tags |
| URL drop | Drop a URL; the browser fetches the bytes and uploads them |
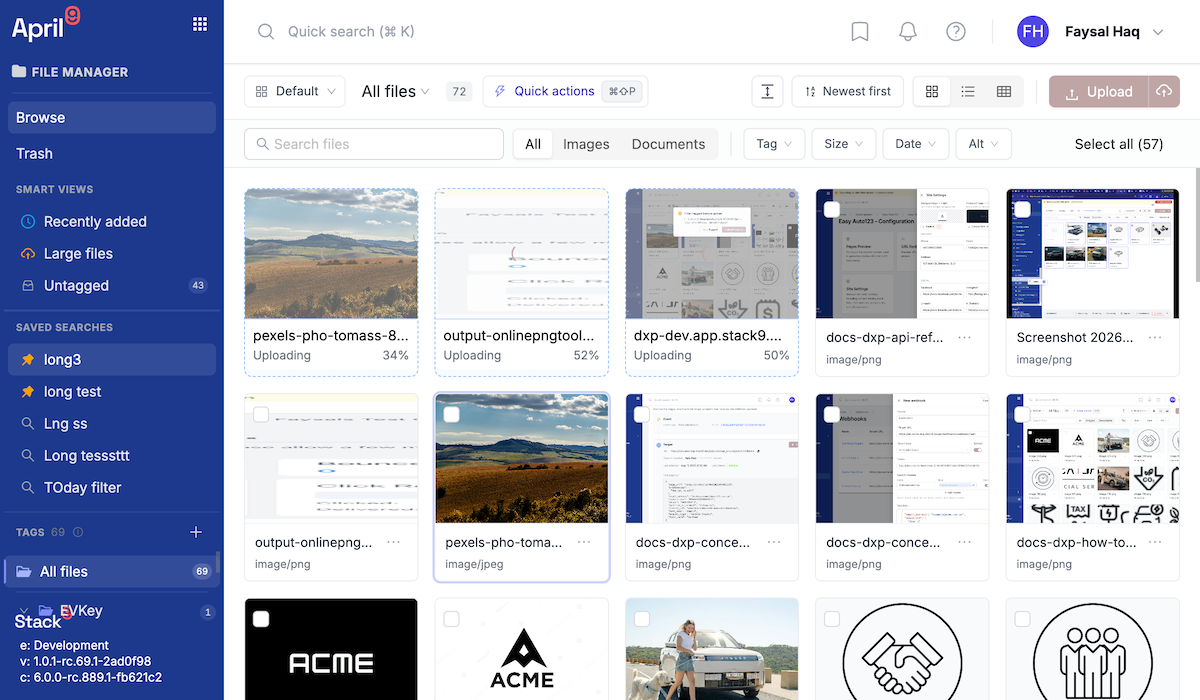
Uploads run through a concurrency-capped queue (4 at a time by default, configurable between 1 and 8), with optimistic thumbnails rendered from memory until the server row appears.
What happens under the hood
Bytes never pass through the application server. Each upload is a five-stage flow:
1. createFile          metadata row created, status = uploading
2. getSignedUploadUrl  broker presigns an S3 PUT, returns file_key + public_url
3. updateFile          row patched with the real file_key and public_url
4. PUT to S3           browser uploads bytes directly to the signed URL
5. confirmUpload       status flips to processing (images) or ready (everything else)
Stages are surfaced in the UI as queued → pre-create → uploading-to-s3 → confirming → awaiting-processing → ready, or failed. Images pass through processing while server-side thumbnails are generated — typically sub-second. The UI does not poll for completion; the next list refresh picks it up.
If the S3 upload or the confirm step fails, the orphaned metadata row is removed automatically, so you never end up with a row pointing at bytes that do not exist.
Driving the signed upload yourself
Two REST calls plus one direct upload. First, presign:
curl -X POST 'https://apis.app.stack9.co/api/file_manager/sign-put-url' \
  -H 'X-API-Key: your-api-key-here' \
  -H 'Content-Type: application/json' \
  -d '{
    "file_id": "a3f19c2e-6d41-4c0b-9a77-2f5b8e1c4d90",
    "original_name": "spring-campaign-hero.jpg",
    "mime": "image/jpeg"
  }'
{
  "file_key": "bu:12/a3f19c2e-6d41-4c0b-9a77-2f5b8e1c4d90/spring-campaign-hero.jpg",
  "signed_url": "https://s3.ap-southeast-2.amazonaws.com/...&X-Amz-Signature=...",
  "public_url": "https://cdn.example.com/bu:12/a3f19c2e.../spring-campaign-hero.jpg",
  "expires_in": 900
}
file_id must be 1-128 characters matching ^[A-Za-z0-9._-]+$. The broker derives file_key deterministically from file_id and original_name — which is what makes byte replacement (Step 5) keep the same URL.
Then upload the bytes to signed_url with the matching content type:
curl -X PUT 'https://s3.ap-southeast-2.amazonaws.com/...&X-Amz-Signature=...' \
  -H 'Content-Type: image/jpeg' \
  --upload-file ./spring-campaign-hero.jpg
public_url is the durable read URL for live objects — use it in content, downloads, and copy-link actions.
Browser uploads fail with an opaque network error if the bucket does not allow PUT from the origin serving the app. If uploads work from curl but not from the browser, this is almost always the cause. The UI surfaces a specific error for it.
Upload gates
Validation happens before bytes leave the browser:
| Gate | Limit | Behaviour |
|---|---|---|
| File size | 100 MB | Blocks the upload |
| Executable MIME types | application/x-msdownload, application/x-sh, and similar | Warns; you can override |
| Very large images | Over 8192 px on either edge | Warns; you can override |
| OS junk files | .DS_Store, Thumbs.db, AppleDouble ._* | Silently stripped |
| Content hashing | Files up to 200 MB | Above that, no hash is stored, so no dedup |
Treat the numbers above as the behaviour of the shipped UI, not as guaranteed server-side enforcement. Confirm your environment's limits before designing a workflow around a hard boundary.
Supported asset types
| Category | Matches | Handling |
|---|---|---|
| Image | image/* | Thumbnails, full-size Quick Look, dimensions probed and stored |
| SVG | image/svg+xml | Its own filter chip; also matches Image |
| Video | video/* | First-class filter category, stored and managed like a file |
application/pdf | Generic icon preview | |
| Document | Anything not image and not video | Straight to ready, no processing step |
There is no inline video player, no transcoding, and no poster-frame generation. Quick Look shows a generic file icon with an "Open in new tab" action. Plan video workflows around storage and distribution, not playback inside the product.
Step 3: Organise with the tag tree
There is no folder entity. Organisation is a hierarchical tag tree, and each file can carry many tags — which is strictly more powerful than folders, because one asset can live in several places at once without being copied.
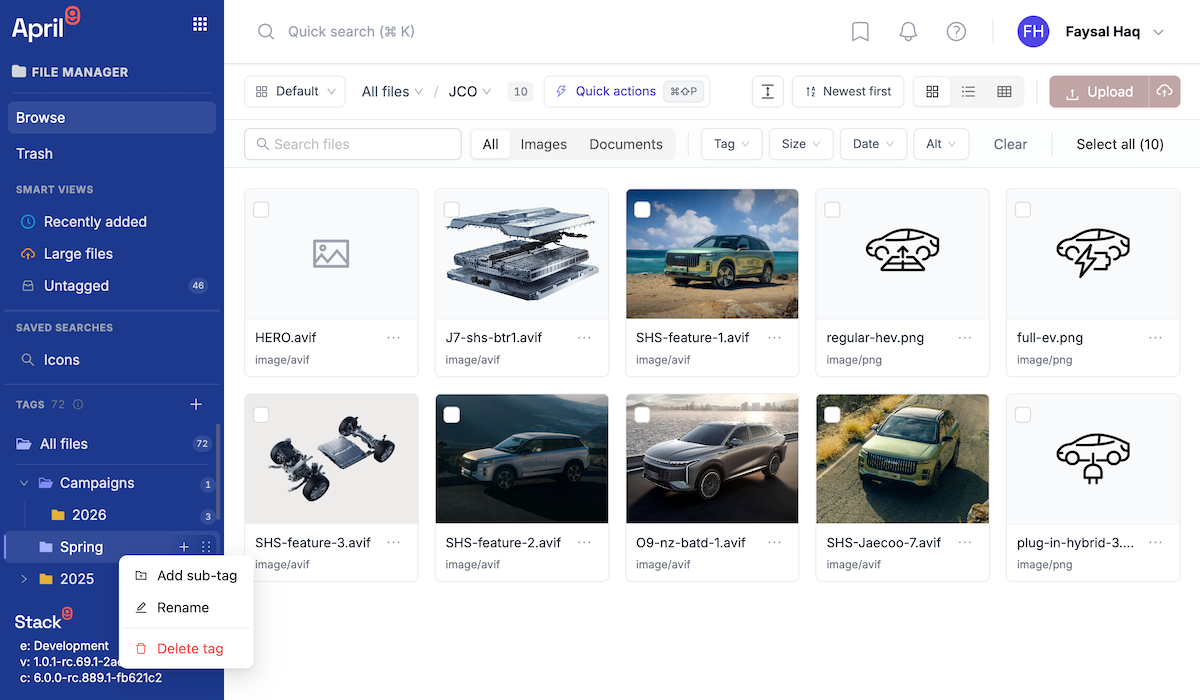
- Create a tag from the tag tree sidebar; nest it by choosing a parent.
- Assign tags by dragging files onto a tag, or by editing a file's tags in the detail panel.
- Use the bulk action bar to add, remove, or move tags across a whole selection.
Folder drop is the shortcut. Drop a directory and each folder path is walked top-down and mapped to a chain of tags — reusing existing sibling tags case-insensitively and creating whatever is missing — then every file is tagged with its leaf folder.
So dropping Campaigns/2026/Spring/hero.jpg gives you a Campaigns → 2026 → Spring tag chain and a hero.jpg tagged Spring.
A file may only reference a tag that is Shared or lives in the file's own scope. You cannot tag a Business Unit file with another Business Unit's tag.
Step 4: Search, filter, and save smart views
Three layers, from coarse to precise:
- Search — free text across the library.
- Filter chips — compose MIME category, size bucket (
xs,sm,md,lg), date range (today, 7 days, 30 days, or custom), tagged versus untagged, and has-alt-text. - Sort — by name, created date, size, or MIME, ascending or descending.
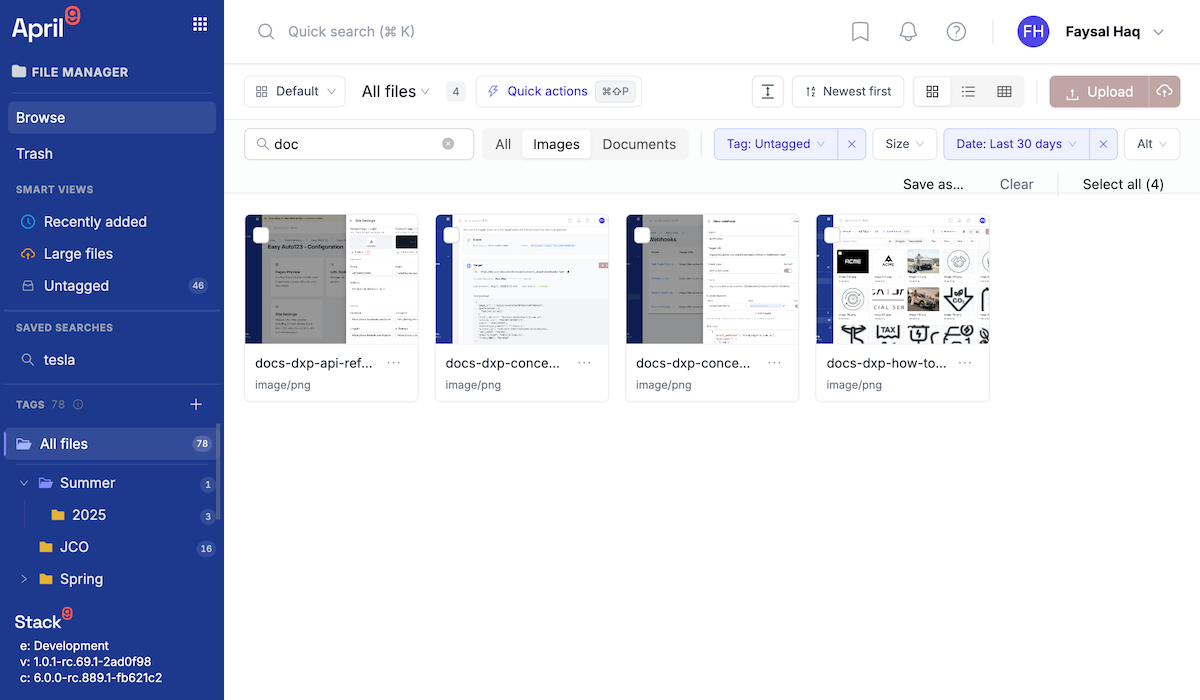
When a combination becomes routine, save it as a smart view. Saved searches serialise the whole filter shape, can be pinned to the top of the sidebar, and are ordered pinned-first, then by sort order, then by name.
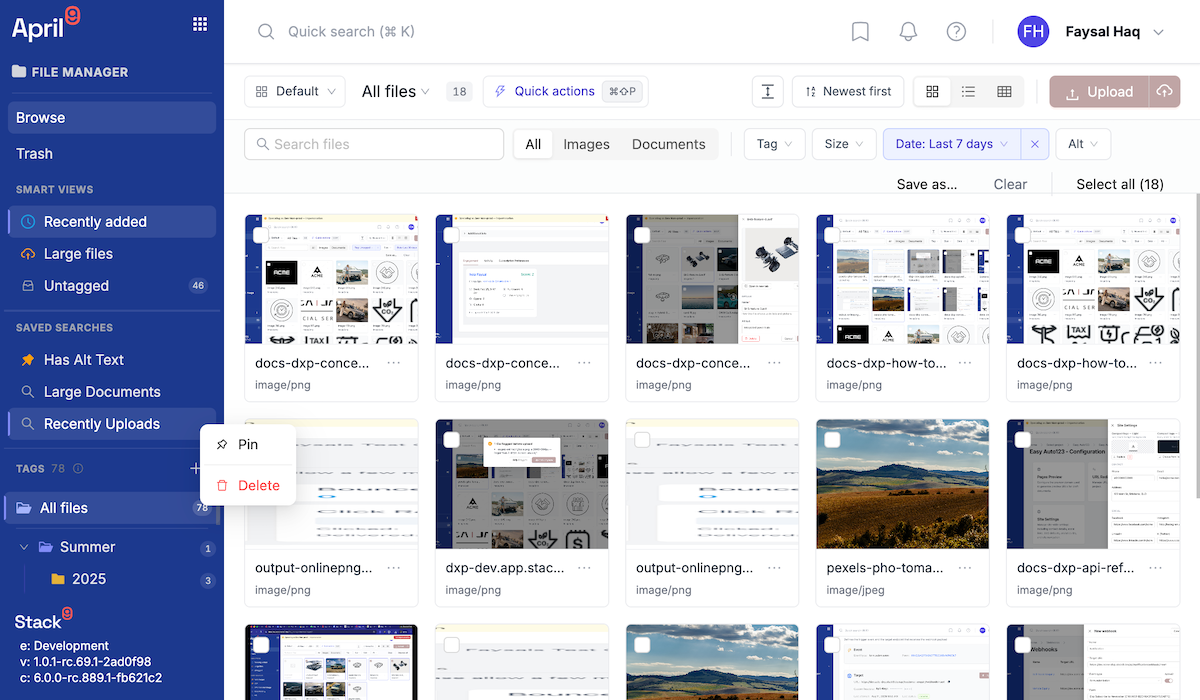
A useful pair to create on day one:
| Smart view | Filters |
|---|---|
| Missing alt text | Category image, has-alt = false |
| Untagged uploads | Tagged = false, date range last 30 days |
The command palette gives you keyboard access to the same operations without leaving the grid.
Step 5: Edit metadata and replace bytes
Open a file to reach the detail panel.
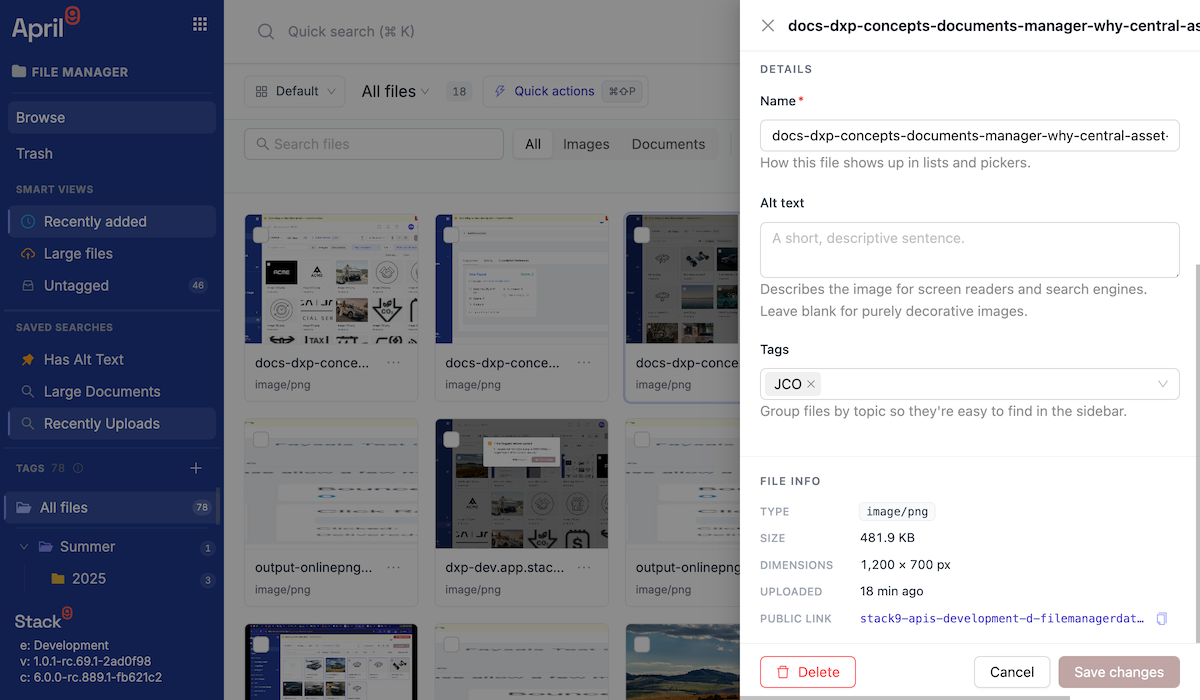
Editable: display name (deduplicated OS-style, so photo.jpeg becomes photo (2).jpeg), alt text, and tags.
Read-only: original_name, mime, size, width, height, public_url, file_key, content_hash, status, processing_error, and the audit fields.
Inserting an image into rich text requires alt text, so filling it in at upload time saves a round trip later. Your "Missing alt text" smart view from Step 4 makes this a five-minute cleanup job rather than an audit.
Dedup: every upload under 200 MB is SHA-256 hashed in the browser and stored as content_hash, so the product can tell you "you already have this file" within the active library before you create a duplicate.
Replace file swaps the bytes behind an existing asset while keeping id, public_url, tags, and alt text intact:
sign against the existing id + original_name
        │
        ▼
PUT the new bytes ──► replaceFile patches size, mime, content_hash, status
        │
        ▼
confirmUpload
Because the storage key is derived deterministically, every page and email already pointing at that asset picks up the new bytes with no re-linking.
Replacement keeps the URL the same, which is exactly why a CDN or browser cache can keep serving the previous image. Verify the change in a fresh session before assuming it is live.
An explicit numeric file_revision on file metadata — incrementing only on byte replacement and feeding a cache-buster into transformed image URLs — is specified but not shipped. Today the only version signals are content_hash and the updated timestamp. Do not build against a file_revision field.
Transformed Image URLs produced by an image proxy (resize, crop, quality, format) are a separate, partially implemented track. What ships today is the Original Asset URL (public_url) plus the editorial crop, focal point, and aspect data that Pages stores on the field value and applies at render time. Confirm what is live in your release before documenting or depending on a transformed-URL contract.
Step 6: Trash, restore, and purge
Deletion is deliberately two-stage.
Trash (soft delete)
Deleting a file moves the S3 object under a private _trash/ prefix — where the bucket policy denies public reads — and marks the metadata row deleted. The canonical public_url is left untouched so restoring is clean.
The ordering is transactional in both directions: if the storage move fails, the metadata delete is aborted; if the metadata write fails after the move, the storage move is rolled back.
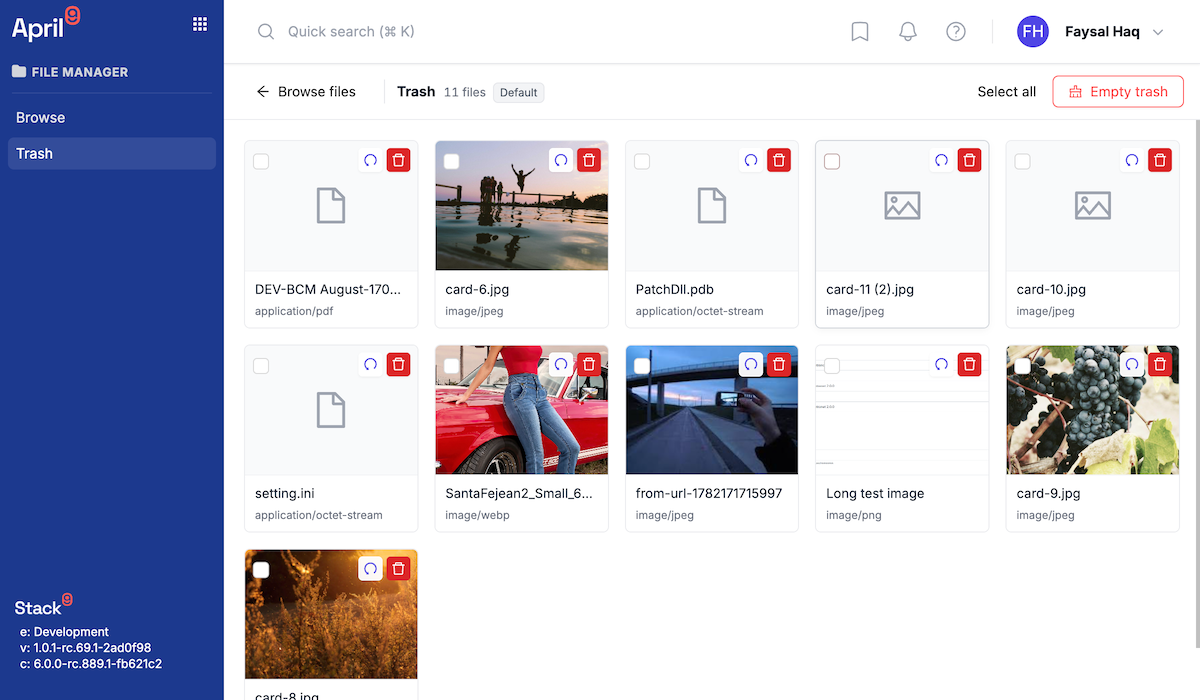
Because trashed objects are private, previews in the trash view use short-lived signed GET URLs, refreshed automatically every few minutes so a long-open trash view never shows broken images.
Restore
Restore is a single server action: it authorizes the row's Business Unit, moves the object back out of _trash/, and clears the deleted flag. The restore target is decided server-side and never sent from the client.
Undo toasts also let you reverse a recent destructive action without visiting the trash screen at all.
Purge (hard delete)
Purge permanently deletes trashed rows and their bytes. Objects are batch-deleted (up to 1000 keys per call), and only the rows whose objects were successfully removed are deleted from the database.
Two guards worth knowing:
- Purge refuses non-trashed rows — the server requires the row to be soft-deleted first.
- Each row's own Business Unit is re-authorized, and failures are collected per row. One refused Shared item does not abort an entire Empty Trash.
delete ──► _trash/ prefix, row soft-deleted ──► restore ──► back to live
                          │
                          └──► purge ──► bytes deleted, row deleted (irreversible)
There is no undo after purge, and no backup surface exposed in the product. Restrict who can purge, and prefer leaving items in trash until you are certain — trashed items are already invisible to the public because the _trash/ prefix denies public reads.
Step 7: Reuse assets from other products
The point of one library is that nothing needs re-uploading. The same pickers appear across the platform.
From a Pages image field
The Pages image field opens the image picker. Selection yields the file's public_url, alt, width, and height, and Pages then stores its own editorial data — focal point, crop, caption, alt — alongside the reference as normalised fractions, so replacing the source later still frames correctly.
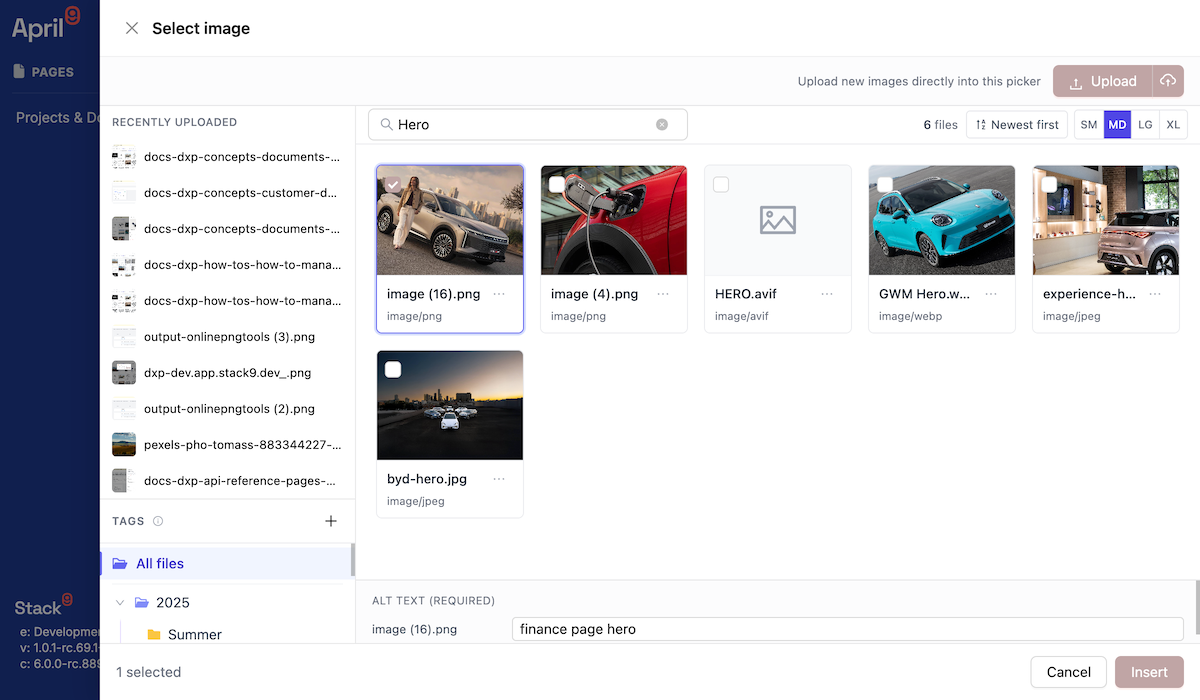
From email and marketing rich text
The rich-text editor's image button opens the same picker, configured to require alt text, and emits URL, alt, width, and height per selection.
Rich-text images render from the editor's own node attributes and carry no crop or focal data. If a specific crop matters, crop it in a Pages image field, or upload a pre-cropped asset.
From any entity form
A drop-in field replacement wires the picker into any entity field via a field-level renderAs, storing the selection in the same JSON shape the framework's native file field uses. It supports both multi-select and image-only modes — so a "Vehicle photos" field on a custom entity draws from the same library as your home page hero.
Copying across libraries
Copying a file into another authorized library creates a fresh key and fresh metadata; the source is never modified and its tags are not carried over. Note that the endpoint backing this operation is not present in the published API specification — use the UI action and confirm availability before scripting it.
Troubleshooting
An upload sits at uploading-to-s3 then fails
The signed URL expired (they are short-lived — presign immediately before uploading), the bucket CORS policy does not allow PUT from your origin, or the Content-Type sent on the upload does not match the one presigned. Check the browser network tab for the failing PUT.
An image stays in processing
Server-side image processing did not complete. Refresh the list — the UI does not poll. If the status persists, check processing_error on the file's metadata; a corrupt or unusually large source image is the usual cause.
A file uploaded but does not appear in the grid
You are looking at a different library, or an active filter or saved search excludes it. Clear the filter chips and confirm the library switcher matches the library you uploaded into.
A file disappeared from a Pages document
It was moved to trash. Trashed objects are moved to a private prefix, so any public reference stops resolving. Restore it from the trash screen, then fix whatever workflow allowed an in-use asset to be deleted.
Previews in trash show broken images
The signed preview URLs expired. Reload the trash view; URLs are re-signed automatically on a short cycle.
Empty Trash reports partial failure
Expected behaviour when the selection includes rows you are not authorized to purge — typically Shared items in a tenant where only a Tenant Owner may modify the Shared Asset Library. Errors are reported per row and the rest still purge.
A tag will not attach to a file
The tag belongs to a different Business Unit. Move the tag to Shared, or create the equivalent tag in the file's own library.
Next steps
- Business Units — libraries, the Shared Asset Library, and who may write to it
- Pages and Documents API — how asset references travel in page content
- How to preview Pages — see picked assets rendered exactly as the live site will render them
- How to add custom items to the sidebar — the pattern the Documents Manager sidebar itself uses